옵션 1: 블루투스를 통해
PiAware 7.0 이상 및 지원되는 브라우저의 경우 Bluetooth를 통해 PiAware를 설정할 수 있습니다.
지원되는 웹 브라우저: Google Chrome, Opera, Microsoft Edge, Android용 Chrome
죄송합니다. 이 브라우저는 Bluetooth 구성을 지원하지 않습니다. 현재 지원되는 브라우저는 Google Chrome 및 Android, Opera, Microsoft에서의 Google Chrome입니다.
Bluetooth를 통해 설정
옵션 2: 수동 구성
온보드 Wi-Fi 또는 USB 어댑터를 사용하여 인터넷에 연결하려는 경우 구성 파일을 편집해야 합니다. Etcher는 포맷 후 Micro SD 카드를 자동으로 꺼내고 Micro SD 카드 또는 USB 어댑터를 물리적으로 제거한 다음 다시 컴퓨터에 연결하여 구성 파일을 편집합니다.
구성 파일을 사용하면 다음과 같이 구성하고 설정할 수 있습니다.
- 유선 네트워크
- 무선(WiFi) 네트워크
- PiAware는 암호화되지 않은 네트워크 또는 WPA/WPA2 암호화 네트워크를 지원합니다. WEP는 지원되지 않습니다.
- 자동 또는 수동 업데이트*
- 다변측정(Multilateration: MLAT) 출력*
- 수신기 유형(RTL-SDR, Beast, Radarcape 또는 기타 모드 S/ADS-B 소스)
- RTL-SDR 게인, PPM 및 장치 색인
*는 사이트의 통계 페이지에서 구성할 수 있는 설정을 나타냅니다.
전체 구성 옵션을 보려면 고급 구성 을 참조하십시오.
구성 파일 형식
구성 파일은 간단한 일반 텍스트 형식 파일입니다. MAC OS의 TextEdit 프로그램은 서식 있는 텍스트 포맷과 스마트 따옴표로 저장하는 것으로 알려져 있으므로 프로그램의 기본 설정에서 해당 옵션이 비활성화되어 있도록 하십시오.
"#"으로 시작하는 줄은 주석 줄이며 무시됩니다. 빈 줄도 무시됩니다. 다른 모든 행은 구성 설정을 지정합니다.
Windows
- 탐색기 프로그램을 엽니다.
- piaware라고 표시된 Micro SD 카드 장치를 선택하십시오.
- piaware-config.txt 파일을 엽니다.
- 파일이 메모장에 열립니다.
Mac OS X
- Finder 프로그램을 엽니다.
- piaware라고 표시된 Micro SD 카드 장치를 선택하십시오.
- piaware-config.txt 파일을 엽니다.
- 파일이 텍스트 편집기에 열립니다.
아래에 텍스트 파일이 열렸으며 Wi-Fi를 사용하도록 설정하는 방법은 굵은 글꼴로 되어 있습니다.
#
# This file configures the Piaware sdcard image
# configuration. Whenever the system boots, this
# file is read and its contents are used to
# configure the system.
#
# Lines beginning with a '#' are comment lines
# and are ignored. Blank lines are also ignored.
# All other lines specify configuration settings.
#

#
# WIRED NETWORK CONFIGURATION
#
# Should piaware use the wired ethernet port
# for network access?
wired-network yes

# Wired network configuration:
# Most networks will use DHCP
wired-type dhcp

# Alternatively, a static address configuration
# can be provided; set "wired-type" to static to use this.
wired-address 192.168.1.10
wired-netmask 255.255.255.0
wired-broadcast 192.168.1.255
wired-gateway 192.168.1.254
wired-nameservers 8.8.8.8 8.8.4.4

#
# WIRELESS NETWORK CONFIGURATION
#

# Should piaware use a wifi adaptor
# for network access? You will need to attach
# a supported USB wifi adaptor for this to work.

# change this to "yes" to enable wifi
wireless-network yes

# Wifi SSID and password.
# This should be changed to match your wireless
# network SSID and, for networks that require
# a passphrase, the passphrase.
wireless-ssid MyWifiNetwork <-----replace MyWifiNetwork with the name of your WiFi (aka the SSID of your local network)
wireless-password s3cr3t <-----replace s3cr3t with the password to your WiFi

# Wifi network configuration:
# Most networks will use DHCP
wireless-type dhcp

# Alternatively, a static address configuration
# can be provided; set "wireless-type" to static to use this.
wireless-address 192.168.1.10
wireless-netmask 255.255.255.0
wireless-broadcast 192.168.1.255
wireless-gateway 192.168.1.254
wireless-nameservers 8.8.8.8 8.8.4.4
Windows
- 파일 편집 후 메모장을 저장하고 닫습니다.
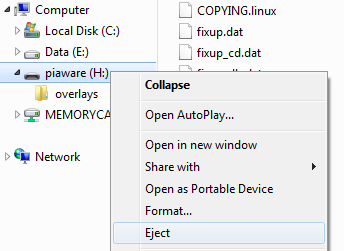
- 꺼내기를 마우스 오른쪽 버튼 클릭하고 선택하여 내 컴퓨터에서 Micro SD 카드를 꺼내거나 시스템 트레이에서 Micro SD 카드를 꺼냅니다.
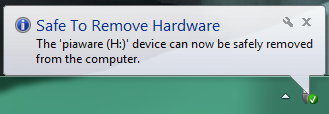
- SD 카드를 제거해도 된다는 팝업이 표시될 것입니다.
Mac OS X
- 파일이 편집되면 저장하고 텍스트 편집기를 닫습니다.
- 꺼내기 아이콘을 사용하거나 Finder에서 Micro SD 카드를 꺼내십시오.
